Wednesday, 18 May 2016

How to fix Outlook "Not Implemented" error during Send/Receive

After some research on the installed programs,discovered that two versions of MS Office were installed on the computer and the Outlook program settings probably were corrupted. So we applied the following solution to solve the “Not implemented” error.

not-implemented

How to solve the “Not implemented” error in MS Outlook

Step 1. Uninstall the Office version that you don’t want.

First of all decide which Outlook and Office version you want to use and then uninstall the other one.
1. To do that go to:
  • Windows 8/7/Vista: Start > Control Panel.
  • Windows XP: Start > Settings > Control Panel
start-control-panel 
2. Double click to open “Add or Remove Programs” if you have Windows XP or “Programs and Features” if you have Windows 8, 7 or Vista).
add-remove-programs_thumb1_thumb1_th[1]
3. In the list of installed programs, find and remove/Uninstall the Office version that you don’t want (e.g. MS Office 365).
uninstall-program_thumb2

Step 2. Repair Office Installation

Next, repair your Office installation, To do that:
1. In the program list, select the “Microsoft Office” version installed on your computer and click “Change” from the top. 
repair-office-2010-2013_thumb1
2. At the next screen, check the “Repair” option and click “Continue”.
image_thumb1
3. When the repair process is completed, restart your computer and work with Outlook again.
Additional Help: If the “Not implemented” error still occurs in Outlook, then try the following:
1. Create a new Outlook profile by going to: Start >  Control Panel > Mail > Show Profiles.
show-profiles
2. Now click the “Add” button to create your new profile and when finished, check the “Prompt for a profile to be used” option and click “OK”.
add-select-profile
3.Open Outlook, select your newly created profile from the list and setup your email account in this profile. Now you should be fine.

Monday, 16 May 2016

Use Outlook Anywhere to connect to your Exchange server without a VPN

NOTE:  A Microsoft Exchange Server account is required.
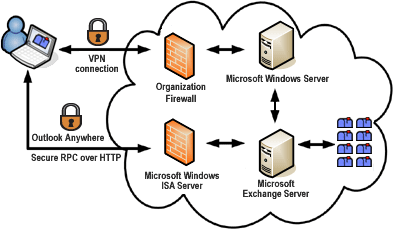
However, access to Exchange when you are outside of your organization's firewall, such as when you are at home or traveling, usually requires a virtual private network (VPN) connection to the organization's network. A VPN provides you with a connection within an organization's network and within its firewall. A VPN also enables access to more network services than those required for just e-mail access.
Connecting to Microsoft Exchange Server
For remote connections, Outlook offers Outlook Anywhere, an alternative to VPN connections that allows you to use Outlook just as you normally do at your organization, without the need for any special connections or hardware, such as smart cards and security tokens. Outlook can connect to Exchange through the Internet by using remote procedure call (RPC) over HTTP. The Outlook Anywhere feature allows you to access your Exchange account remotely from the Internet when you are working outside your organization's firewall.
Outlook Anywhere requires the following:
  • Your account is hosted on Microsoft Exchange Server 2010, Exchange Server 2007, or Exchange Server 2003.
  • Your Exchange administrator must configure the server to permit connections via HTTP. Exchange administrators can find more information about configuring this feature in the Microsoft Office Resource Kit and in Microsoft Exchange documentation.
Enable Outlook Anywhere in Outlook

Your Exchange administrator can automatically configure all copies of Outlook in your organization or provide a special executable script file that enables Outlook Anywhere. You can also manually configure Outlook Anywhere if the system requirements are met and you have the correct URL and security information from your Exchange administrator.
  1. Click the File tab
  2. Click Account Settings, and then click Account Settings.
    Account Settings in the Backstage view
  3. Select the Exchange account, and then click Change.
  4. Click More Settings, and then click the Connection tab.
  5. Under Outlook Anywhere, select the Connect to Microsoft Exchange using HTTP check box.
  6. To specify a proxy server, click Exchange Proxy Settings.
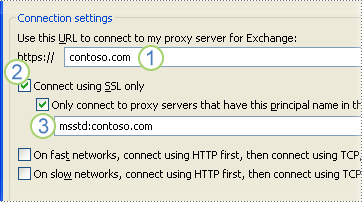
    Connection settings
    1. Type the URL provided by your Exchange administrator.
    2. If your Exchange administrator tells you to use a Secure Sockets Layer (SSL) connection, select the Connect using SSL only check box.
    3. If your Exchange administrator instructs you to do so, select the Only connect to proxy servers that have this principal name in their certificate check box, and then type msstd: followed by the URL provided by the administrator.
  7. Under Proxy authentication settings, click Basic Authentication or NTLM Authentication as instructed by your Exchange administrator.
    Proxy authentication settings
NOTE:  If you click Basic Authentication or NTLM Authentication and an LM Compatibility Level of less than 2, you will be prompted for a password each time a connection is made to Exchange. With Basic Authentication, the password is sent in clear text. For increased security, we recommend that you select the NTLM Authentication and Connect using SSL only options.

Setting Up Outlook 2010 for Exchange

1. Open Mail Setup.

  • Click the Windows Start button, select Control Panel, then select the Mail icon.
    Note: Depending on which version of Windows you are running, you may need to switch to Classic view to find the Mail entry or it might be labeled 32-Bit.
  • Select the Show Profiles button, select the Add button, enter a name for this profile, and select the OKbutton.
  • .

3. Manually configure server settings.

ul>
  • Select Manually configure server settings or additional server types.
  • Click Next.

    Task screenshot

4. Choose email service.

  • Select Microsoft Exchange.
  • Click Next.

    Task screenshot

5. Enter information in the Settings window

  • Enter findmailbox.ucsd.edu in the Microsoft Exchange server field.
  • Enter your AD username in the User Name field.
  • Click Check Name to make sure these fields are correct.
    • If a warning message appears, ask your system administrator or the ACT Help Desk for your department's Exchange server name.
  • If you access your email from off campus, go to steps 6-7. If not, continue.
  • Click Next, then click Finish.
  • Go to step 8.

    Task screenshot

6. Access Exchange from off campus.

  • The first time you set up this access, you need to connect to the UCSD VPN.
    • Note: After the initial setup, Outlook 2010 connects securely to your UCSD Exchange account without the VPN.
  • Click More Settings.
  • Click the Connection tab.
  • Select Connect to Microsoft Exchange using HTTP under Outlook Anywhere.
  • Click Exchange Proxy Settings.
     Task screenshot

7. Set up Exchange Proxy Settings.

  • Enter mail.ucsd.edu in the Connection settings field.
  • Select On fast networks, connect using HTTP first, then connect using TCP/IP.
  • Select On slow networks, connect using HTTP first, then connect using TCP/IP.
  • Select Basic Authentication from the pull-down menu under Proxy authentication settings.
  • Click OK.
  • Click Next, then click Finish.

    Task screenshot

8. Re-enter AD username if prompted.

  • If the window shown below appears, enter ad, a backslash, and your username in the User name field.
  • Enter your AD password in the Password field.
  • Click OK.
    Task screenshot

9. View the headers of a message.

  • To view the headers, select a specific message in the main Outlook window. Every email message contains header lines of technical and/or delivery information. These headers usually remain hidden unless you instruct Outlook to display them. The headers are useful when setting up spam filters or configuring more complex settings.
  • Double-click the message
  • Click FileInfoProperties.
    Task screenshot

10. Review the headers.

  • In the Properties window, review the internet headers field at the bottom.
  • Highlight the information to save it, and right-click to open the Edit menu.
  • Select Copy and paste the contents of your clipboard in a new window.
  • Click Close.
    Task screenshot

Remove shortcut virus from PC/Laptop/Pen drive

This post is about Remove shortcut virus, In our PC/Laptop or in Pen drive we generally see one shortcut type folder which created automatically, many times when we use internet and downloading something then it might be that shortcut virus downloaded within your downloaded file and many times when we transfer the data from one computer to another computer and if one computer is affected fromshortcut virus then surely other attached computer will also affected by shortcut virus in between data transfer, many times we insert our pen drive or any other external drive into other’s PC which are already affected by shortcut virus then our pen drive or external drive will be affected from shortcut virus.


Remove shortcut virus Remove shortcut virus How to Remove shortcut virus from PC/Laptop/Pen drive – Solved!  fet
I personally faced the shortcut virus problem in my PC, the shortcut virus damage the computer OS slowly, slowly, shortcut virus will create shortcut folder and file name same as original folder and file name and if you click on that shortcut virus files and folder then it will infect your PC poorly.
For the solution of the Shortcut Virus problem I am going to write some easiest way to remove shortcut virus from PC/Laptop/Pen drive and other external drives. There are lots of methods available to remove shortcut virus, including CMD, Registry entry, free software, Paid software, using .Dat file etc. Here i will explain the way to remove shortcut virus from computer, Remove shortcut virus USB (Delete Shortcut Virus).

How to Remove Shortcut virus using CMD

If you are suffering from the shortcut virus problem, then surely you tried to remove shortcut virus files manually, but files are not removed, they show some error messages, so for the solution of this error message simply follow the below step and remove shortcut virus from your PC.
Step 1) Open CMD (Command Prompt – DOS)
Step 2) Write the below command
attrib -h -s -r -a /s /d Name_drive:\*.*
Simply replace the Name_drive with your actual drive letter, for example, if you want to remove shortcut virus from C drive, then type attrib -h -s -r -a /s /d c:\*.*
Step 3) Hit enter button
Step 4) Now, after that all the shortcut virus files and folder will be normal files and folder form simply go and delete the shortcut virus files and folder.

How to Remove Shortcut virus using a .bat file

Bat file is nothing but an executable file which can create in notepad and directly executed by double clicking on it, you can also do the above method, process using .bat file, I know you are thinking that why he writes same method twice, but guys you have noticed that if your all drives are infected from shortcut virus then you have to run above command separately for each and every drive, it takes your lots of important time so the solution of this problem I am writing the new method to remove shortcut virus.
Step 1) Open notepad file
Step 2) Copy and paste the below code into a notepad file
@echo off
attrib -h -s -r -a /s /d Name_Drive:\*.*
@echo complete.
Step 3) simply replace the Name_Drive with your infected drive name, if you have more than 3 drive then simply copy and paste the command.
Step 4) Save the file with name removevirus.bat
Step 5) Now simply close the file and run it
Step 6) After that all of your Shortcut virus files and folder are in normal form, now go and remove the shortcut files and folders.

Remove shortcut virus using ‘Shortcut virus remover software’

This method is the easiest and best method to remove shortcut virus from PC, there is a strong reason behind it, In above methods (CMD and.Bat file) you have to run command manually and delete each and every shortcut virus file and folder manually, I know you are also lazy like me ðŸ˜‰ who don’t want to waste their time in executing commands and delete files manually, so for the solution of this problem follow the below steps and believe me this software helps you a lot and remove all of your shortcut virus from your PC/Pen drive.
Step 1) First of all download the “Shortcut Virus Remover software free download” 
Step 2) Open the shortcut virus remover software
Note: The software it doesn’t need to install, it directly run
Step 3) Select the Pen drive or Computer (Select from which you want to remove viruses)
Remove shortcut virus Remove shortcut virus How to Remove shortcut virus from PC/Laptop/Pen drive – Solved!  soft 1
Step 4) Now selects the Drives and click on the Scan button
Remove shortcut virus Remove shortcut virus How to Remove shortcut virus from PC/Laptop/Pen drive – Solved!  soft 2
Step 5) After that click on the Delete button
That’s it, now all of your shortcut virus files from your PC/Laptop/Pen drive are removed.

Sunday, 15 May 2016

Free Video Call Recorder for Skype

Free Video Call Recorder for Skype

Free Video Call Recorder for Skype


Size: 29.11 MB, Vers.: 1.2.50.511
It is the first free Skype video call recorder in the world for recording Skype calls without any limitations.
With its help one may record Skype calls in the following modes:
- picture-in-picture (the program records audio and video of all sides of the conversation);
- only video of other sides;
- only audio (all sides).
Exclusive advantages of Skype video recorder:
- sincere to use and simple interface;
- high quality video/audio recording;
- low processor (CPU) requirements;
- 'pause recording' feature;
- no extra libraries are needed to use the program;
- live broadcast recording (without re-encoding).
You just need to specify the mode you like, choose the output folder and press “Start”. If you don't want to record some moments during the conversation, just click on “Pause”. In order to finish the record select “Stop”.
The program creates mp4 video from video calls and mp3 audio from audio calls which are supported by most modern players.
Free Video Call Recorder for Skype contains no spyware or adware whatsoever. It's 100% free and absolutely safe to install and run. It's free both for personal and commercial use.
DVDVideoSoft's products are freeware. In order to maintain product development and provide you with high-quality software, DVDVideoSoft may bundle links to other websites and third-party apps installations including toolbars in its products. Every time DVDVideoSoft products are installed, you have an obvious option to accept or opt-out of such installations.
Windows 10, 8, 7, Vista, XP SP3
http://www.dvdvideosoft.com/download.htm?fname=FreeVideoCallRecorder.exe

Download

Size: 29.11 MB, Vers.: 1.2.50.511

Restore the archived information in Outlook

Outlook 2010
There are 3 ways to restore the data from your archives. You can or you can move individual items from a .pst file into their original folder or a new one, copy the e-mail back to the original folder, or you can copy the e-mail to a new folder.
To open a .pst file:
  1. On the File tab, click Open.
  2. Click Open Outlook Data File (.pst).
  3. Choose the PST file and click OK.
  4. The folders from the PST file will now appear in the folder sidebar. 
To move individual items from a .pst file into their original folder or a new one
  1. On the File tab, click Open.
  2. Click Open Outlook Data File (.pst).
  3. Choose the PST file and click OK.
  4. The folders from the PST file will now appear in the folder sidebar.
  5. Click the folder containing the items you want to move.
  6. Select the items you want to move, and then drag them into their original folders in theFolder List.  
To copy all archived items from a .pst file back into their original folder:
  1. On the File tab, click Open.
  2. Click Import.
  3. Click Import from another program or file. Click Next.
  4. Click Outlook Data File (.pst). Click Next.
  5. Click Browse and choose the file you wish to import.
  6. There are three options for importing regarding duplicate files: Replace duplicates with items imported, Allow duplicates to be created, Do not import duplicates. This will decide what Outlook does with identical files in the destination folder.
  7. Select the folder to import from (if you want to import complete data don’t change any settings). Make sure Include subfolders is checked. Select Import items into the same folder in: and choose the Outlook folder the items were originally stored in. Click Finish.  
To copy all archived items from a .pst file back into a new folder:
  1. In Outlook, create a new folder to copy the archived items to.
  2. On the File tab, click Open.
  3. Click Import.
  4. Click Import from another program or file. Click Next.
  5. Click Outlook Data File (.pst). Click Next.
  6. Click Browse and choose the file you wish to import.
  7. There are three options for importing regarding duplicate files: Replace duplicates with items imported, Allow duplicates to be created, Do not import duplicates. This will decide what Outlook does with identical files in the destination folder.
  8. Select the folder to import from (if you want to import complete data don’t change any settings). Make sure Include subfolders is checked. Select Import items into the current folder. Click Finish.

Outlook 2007
There are 3 ways to restore the data from your archives. You can copy the e-mail back to the original folder, you can copy the e-mail to a new folder, or you can move individual items from a .pst file into their original folder or a new one.
To copy all archived items from a .pst file back into their original folder:
  1. On the File menu, click Import and Export.
  2. Click Import from another program or file. Click Next.
  3. Click Personal Folder File (.pst). Click Next.
  4. In the File to import box, change the default file name in the path from backup.pst to the name of the archive file you're importing from. Click Next.
  5. Click the folder to import from. If you want, click Include subfolders.
  6. Specify how you want Outlook to handle duplicate items.
  7. Click Import items into the same folder in, and then click the folders with the same name as the folders you're importing from.
  8. Click Finish.
To copy all archived items from a .pst file back into a new folder:
  1. In Outlook, create a new folder to copy the archived items to.
  2. On the Go menu, click Folder List, and then in the Folder List, click the new folder.
  3. On the File menu, click Import and Export.
  4. Click Import from another program or file. Click Next.
  5. Click Personal Folder File (.pst). Click Next.
  6. In the File to import box, change the default file name in the path from backup.pst to the name of the archive file you're importing from. Click Next.
  7. Click the folder to import from. If you want, click Include subfolders.
  8. Specify how you want Outlook to handle duplicate items.
  9. Click Import items into the current folder.
  10. Click Finish.
To move individual items from a .pst file into their original folder or a new one
  1. On the Go menu, click the Folder List, and then click Archive Folders (or the name you used for the archive location).
  2. Click the folder containing the items you want to move.
  3. Select the items you want to move, and then drag them into their original folders in theFolder List.